I am using Illustrator9 on a PC here. All references to the program will correspond to the default PC Ill9 setup. If you are using 10, this tutorial should still work, but there may be some extra steps you have to take, and the commands may not be exactly the same.

1.) Make a box: If you can't do this, you should start with an easier tutorial.
2.) Distort the box: Again, simple stuff. There are several ways to do this. I probably just grabbed the points and dragged them. The point here is to get an irregular shape.
3.) Punk the box: This is found under both the filter and the effects drop downs. (If you use the "effects" version, be sure to expand the box afterwards.) I punked about 40% I think. Experiment.
4.) Replicate & Rotate: Here I multi-replicated the box using (effect>distort&transform>transform) I made about 25 copies of my object for this tutorial (in my illustration I used a LOT more). Set rotation to 360, and check the "random" box.
5.) Randomize: Now expand the shape, and ungroup (cntrl-G) a few times to make sure all your objects are separated. Use (object>transform>transform-each) to randomly resize about 10% and rotate all objects again, the difference this time is that all objects vary independent of one another other. The goal here is to achieve the appearance of natural variations. How you get to this point is not as important as getting the "look."
6.) Transparency: Now make sure all your objects are still separate or this won't work. Select everything and set transparency to about 40%. If you are making this on a white background, the effect may not be very noticeable, but as you can see, each object appears to layer over the next. If you've gotten this far, the hard part is over...
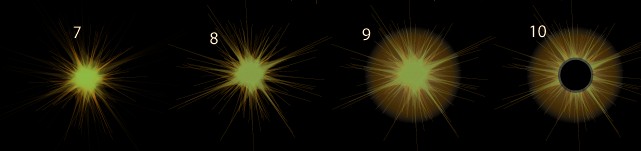
7.) Group and dupe: Now I group my selection, and duplicate it (Cntrl-C) copy, (Cntrl-F) Paste in Front. I then rotate it, and change color. I went a bit more green on this version, just to illustrate the possible variations.
8.) Tweak: I resize the green layer, and reduce my transparency to about 7%.
9.) Add backdrop: Drop a circular gradient behind the whole thing. (Mine went from white to brown to black)
10.) Add a pupil: This is really two circles, the outer one is black too, but at 50% transparency.
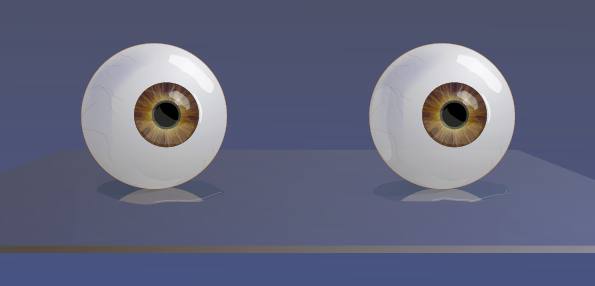
Addendum: Making the iris was the hardest part of the illustration. After this, I masked off the iris, and started working on my eyeball. The rest of the eye is just a circle with an offset circular gradient. I added semi transparent highlights and voila.
I realize that for some this is going to be too much and for others, not enough, but it's a start, and it's posted. Learn from it, and grow. If you end up making something down the line, send me a pic, as thanks... If I get enough people bugging me, I'll keep this going, and put up more like it... Let me know if you're interested. johnwun@aol.com
Click here for the 1024x786 version, it makes a neat wallpaper if you don't mind being stared at.
